When your AC refuses to turn on during a hot day, it's easy to assume the worst. But before you panic and schedule a costly service call, know this: the problem is often something surprisingly simple. A few quick checks, starting with the most common culprits, can often get you back up and running in minutes—no tools required.
Your First Checks When The AC Won't Start
That moment of silence when you're expecting a blast of cold air is beyond frustrating. But hold off on assuming a catastrophic failure. From my experience, most "dead" AC units are suffering from a simple and easily fixable issue. We'll walk through it like a pro would, using a process of elimination that starts with the easiest things to check.
Our first stop is the command center for your entire HVAC system: the thermostat. After that, we'll head to the main power source for your whole house.
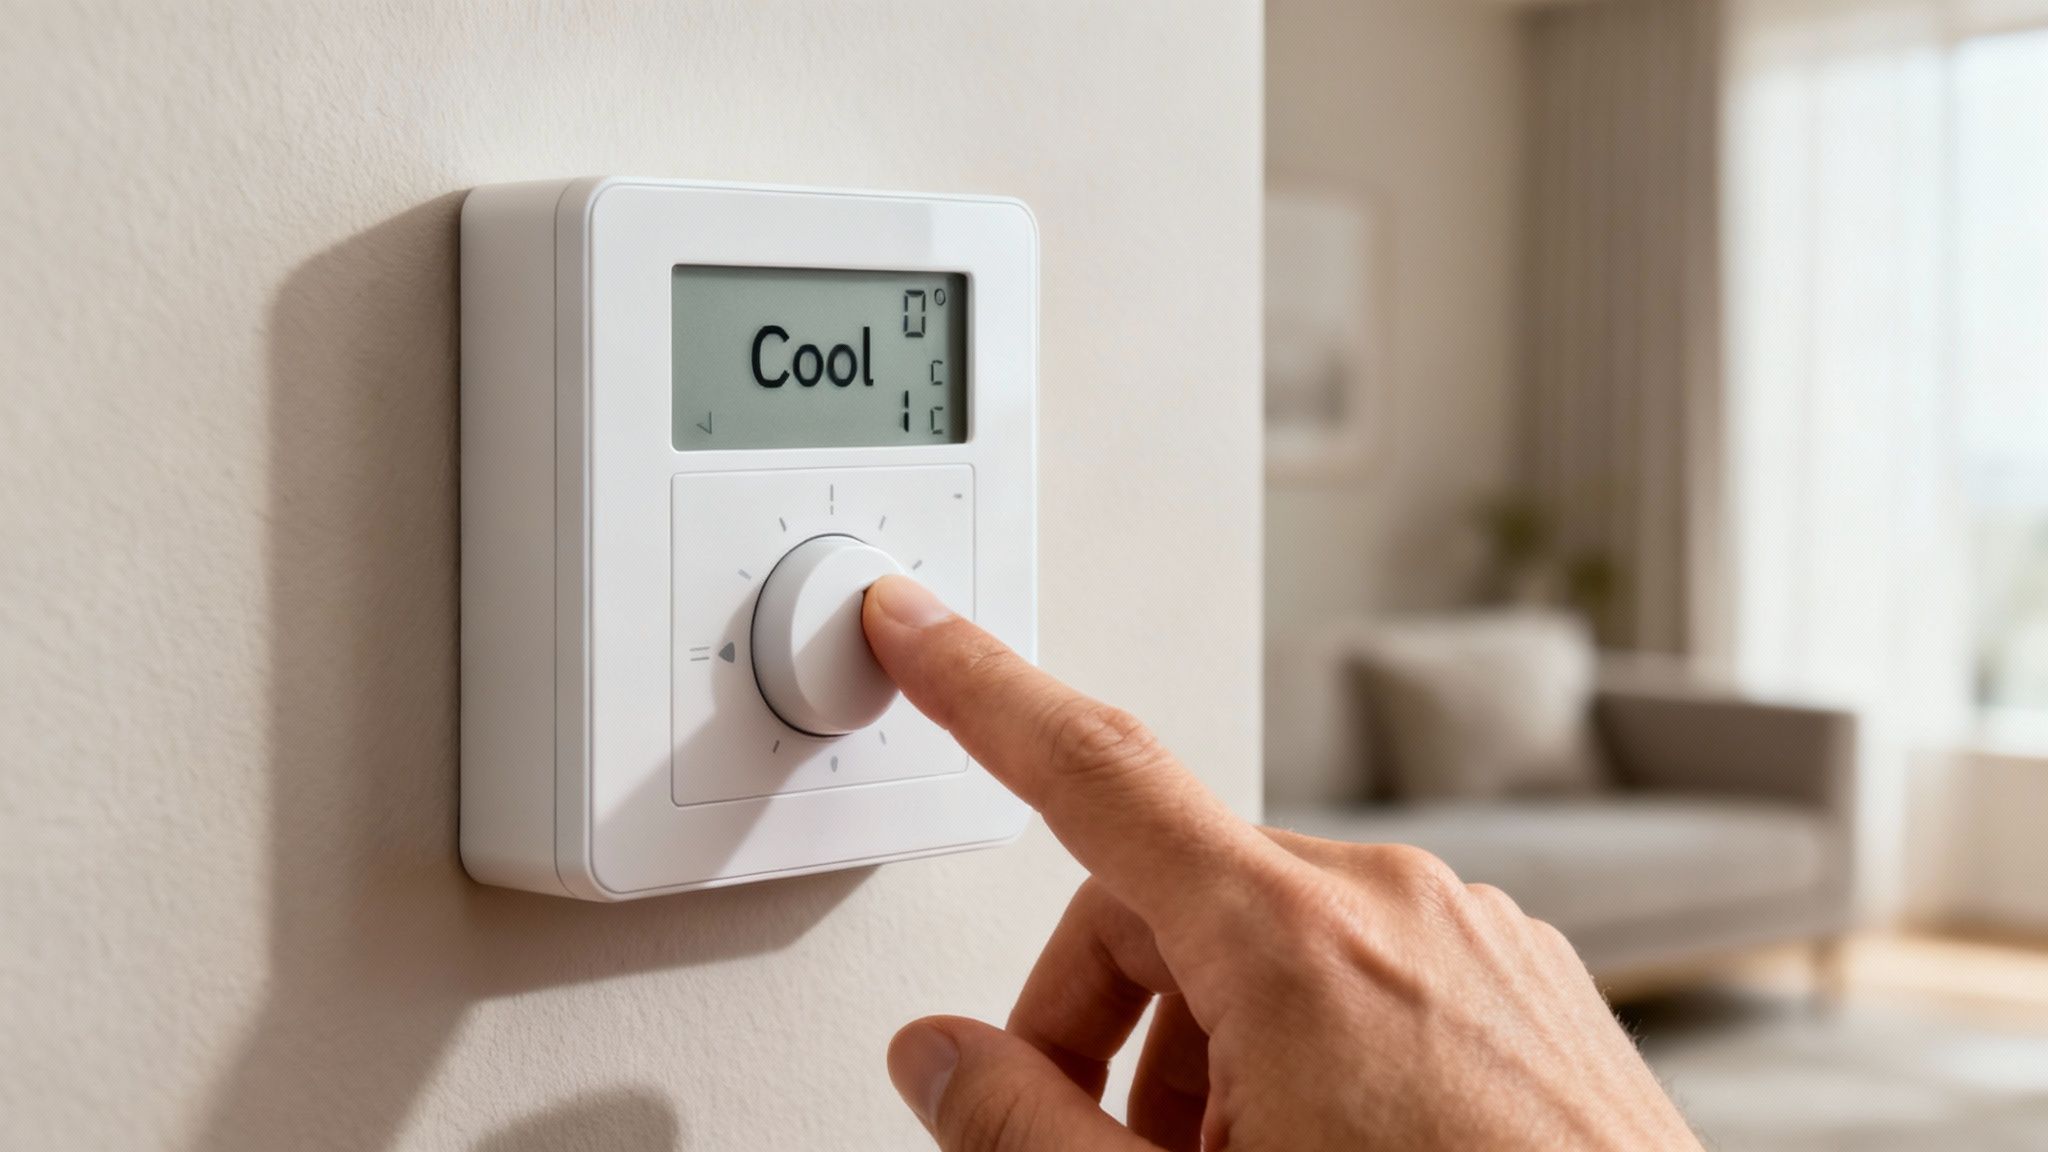
Start At The Thermostat
The thermostat is the brain of your cooling system, but it's also where a lot of simple mistakes happen. You'd be surprised how many service calls I've been on where the fix was right on the wall.
First, make sure the thermostat is actually set to 'Cool' mode. It sounds obvious, but it's easy to forget it was last set to 'Heat' or 'Off' when the seasons change.
Next, look at the temperature setting. For the AC to kick on, the set temperature must be lower than the current room temperature. If you have it set to 75°F and your house is already a comfortable 72°F, the system is just doing its job by staying off.
Finally, if your thermostat uses batteries, check them. A blank or dim screen is a dead giveaway, but even if the screen looks fine, weak batteries might not have enough juice to send the signal to your AC unit.
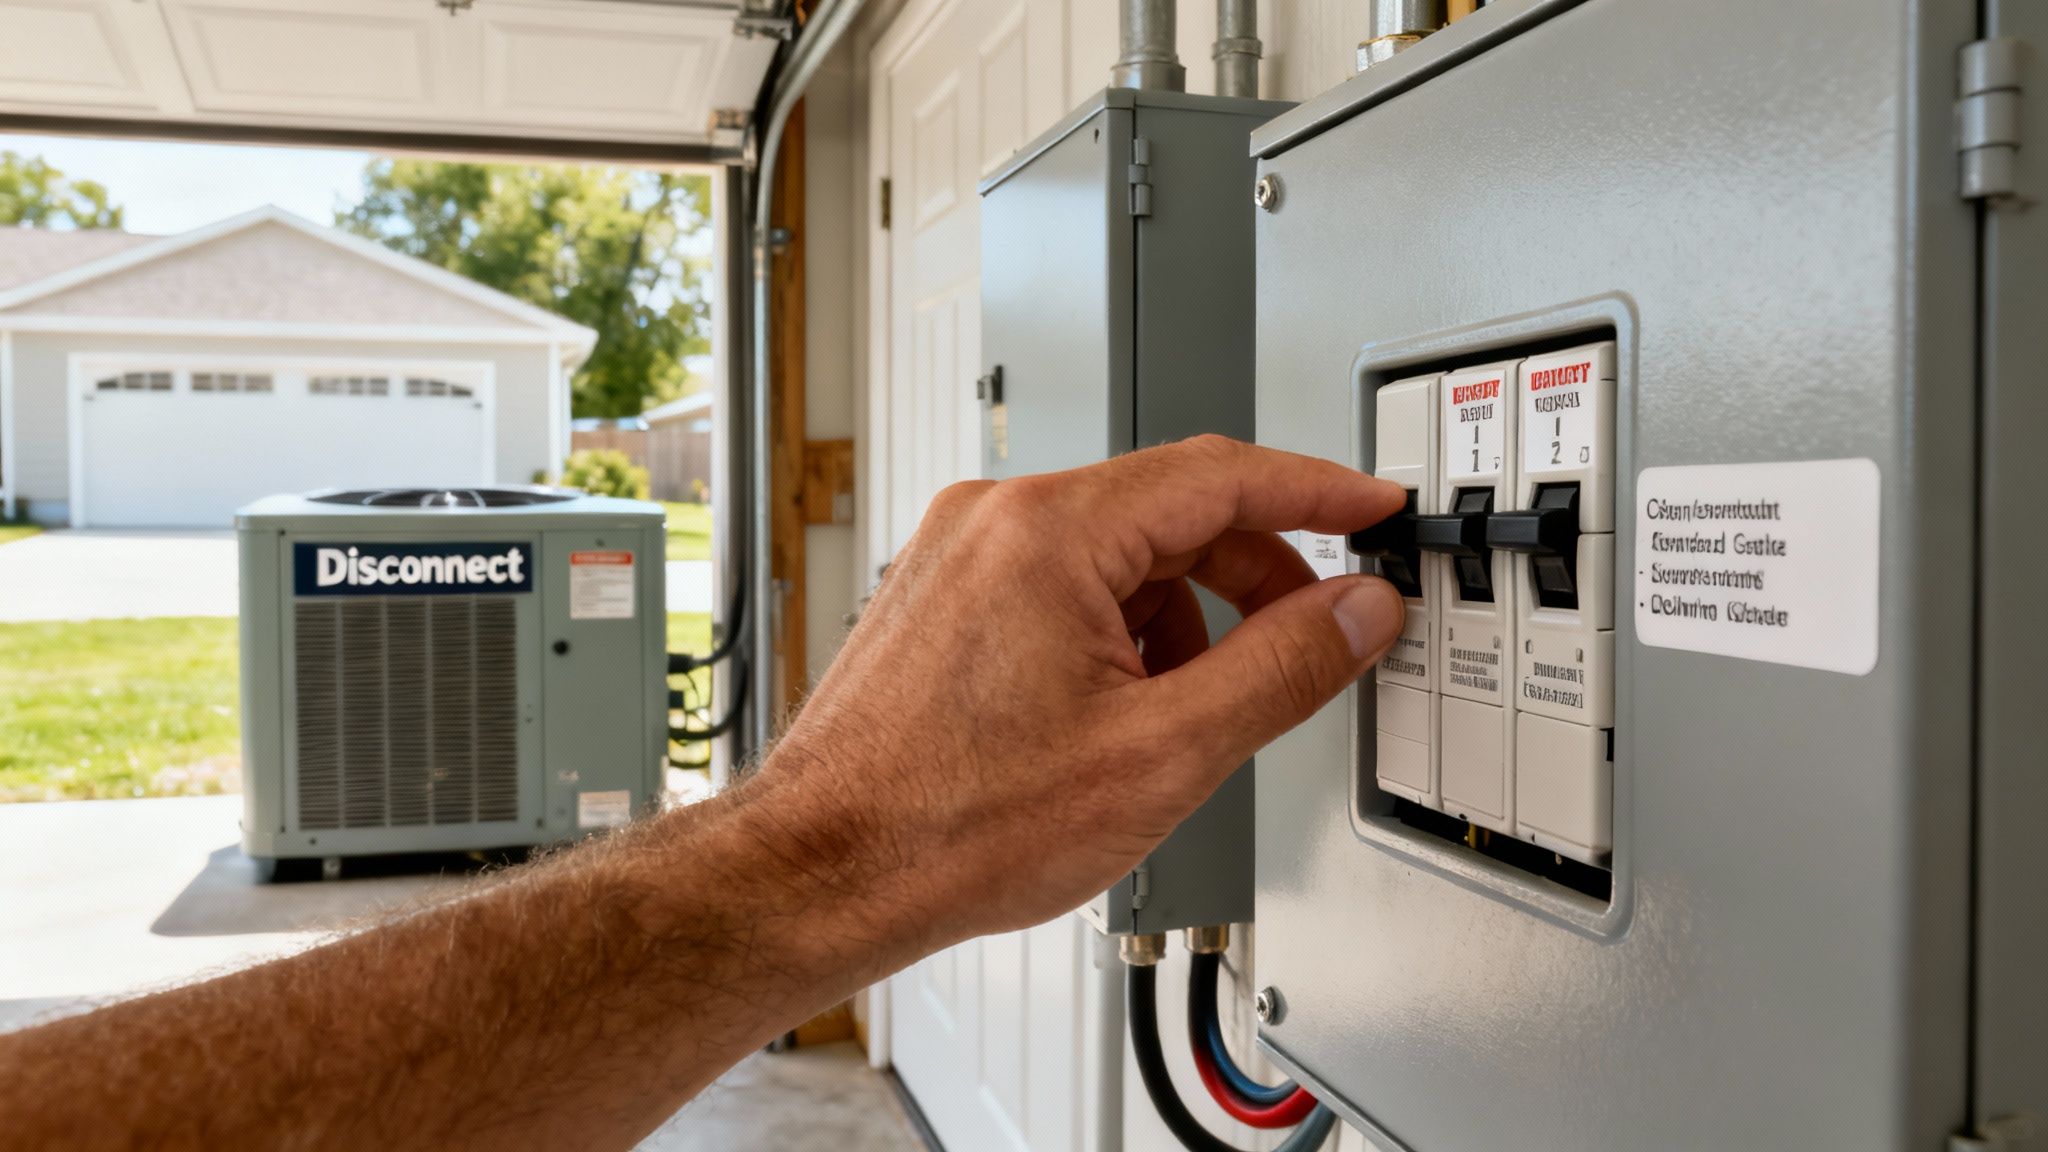
Check The Circuit Breaker
If the thermostat settings are correct and the batteries are good to go, your next stop is the electrical panel. A tripped circuit breaker is probably the single most common reason an AC will seem completely dead. Air conditioners draw a ton of power, and a power surge can cause their dedicated breaker to trip to protect the equipment.
Find your breaker box and look for a switch that’s flipped to the 'Off' position or is stuck halfway between 'On' and 'Off'. To reset it, you have to push the switch firmly all the way to 'Off' first, then you can flip it back to the 'On' position.
Safety First: If that breaker trips again right after you reset it, do not touch it again. This is a clear sign of a more serious electrical problem that needs a professional diagnosis to prevent equipment damage or even a fire.
For a quick reference, here's a simple checklist that covers these initial steps. It's what I'd run through first on any service call.
Quick Troubleshooting Checklist For An AC That Won't Turn On
Troubleshooting StepPotential CauseEstimated DIY CostTime To CheckCheck Thermostat SettingsIncorrect mode (e.g., 'Heat' or 'Off'), setpoint too high$0< 1 minuteReplace Thermostat BatteriesWeak or dead batteries preventing a signal$5 - $102 minutesReset Circuit BreakerTripped breaker from a power surge or overload$05 minutes
These three steps solve a huge number of "no power" issues without costing you anything more than a few minutes of your time and maybe the price of a couple of batteries.
This flowchart gives you a simple visual path to follow for these first critical checks.
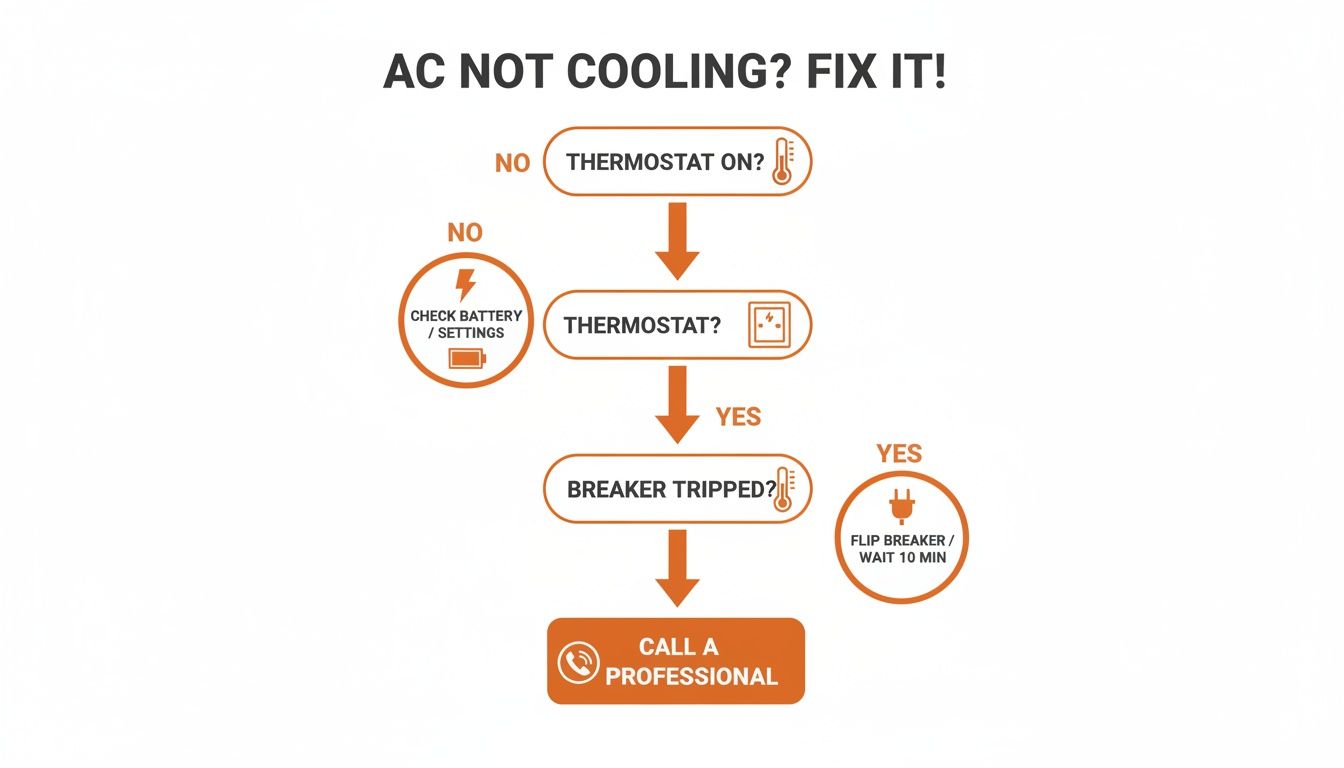
As you can see, the thermostat and breaker are the two checkpoints that resolve a massive percentage of AC startup failures. In fact, thermostat issues are the second-most common reason for no-start problems every year. For more hands-on advice and maintenance guides, feel free to explore other articles on our blog.
Checking Your System Power And Safety Switches
If your thermostat seems fine but the AC is still dead, the next stop on our troubleshooting tour is the power supply. Your HVAC system has several built-in safety features designed to shut it down to prevent electrical surges or physical damage. More often than not, one of these has been triggered.
Let’s walk through how to safely inspect the most common culprits, starting with the heart of your home’s electrical system.
Locate The Correct Circuit Breaker
Your journey begins at the main electrical panel. A tripped circuit breaker is the single most common reason an AC won't power on. In fact, it's responsible for nearly 30% of all 'AC not turning on' service calls we see.
Why is it so common? Air conditioners are power-hungry beasts, drawing up to 5,000 watts on startup. This massive surge can easily trip a breaker, especially in homes with older electrical panels. You can find more insights on common AC issues over at grheatingcooling.com.
Open your electrical panel and scan the labels. You’re looking for breakers dedicated to your HVAC system—there are usually two of them. One powers the indoor air handler, and the other is for the outdoor condenser. They’re often labeled "AC," "Air Cond," or "HVAC."
If a breaker has tripped, it won’t be aligned with the others. It will be stuck in the middle position or flipped completely to 'Off'. To reset it, you have to push it firmly all the way to 'Off' first, then flip it back to 'On'.
A Critical Warning: If that breaker trips again right away, stop. Do not reset it again. This signals a serious electrical problem like a short circuit. It's time to turn everything off and call a licensed HVAC professional immediately.
Inspect The Outdoor Disconnect Switch
Next, you'll need to head outside to your condenser unit. Somewhere on the wall nearby, there will be a weatherproof electrical box. This is the disconnect switch, and by law, every AC unit must have one. It's there so technicians can safely kill the power right at the unit before starting any work.
These disconnects come in a few flavors:
Pull-Out Style: This type has a T-shaped handle that you literally pull out to cut the power. Give it a look and make sure it’s pushed in all the way.
Lever Style: This one looks like a beefy, oversized light switch. Just check that the lever is flipped to the 'On' position.
Breaker Style: Some boxes have their own dedicated circuit breaker inside. Pop it open and see if it has been tripped.
It’s surprisingly easy for these switches to get bumped or shut off during yard work or by a stray basketball. Making sure it’s properly engaged is a simple check that can save you a service call.
Check The Condensate Overflow Switch
For our last check, head back inside to your indoor unit (the air handler). As your AC runs, it pulls moisture from the air, which collects and drains away through a PVC pipe. If that drain line ever gets clogged with algae or debris, water will back up into a drain pan.
To prevent a costly flood, there's a small safety device called a condensate overflow switch. It’s a simple float that rises with the water level. If the water gets too high, the float hits the switch and cuts all power to the AC system. It’s doing its job perfectly.
Look for a small device wired into the side of the drain line or pan, usually with a clear or white plastic top. If you see standing water in the drain pan, you've found your problem. A clogged drain is almost certainly why your ac unit is not turning on, and it won't start again until that blockage is cleared and the pan is completely dry.
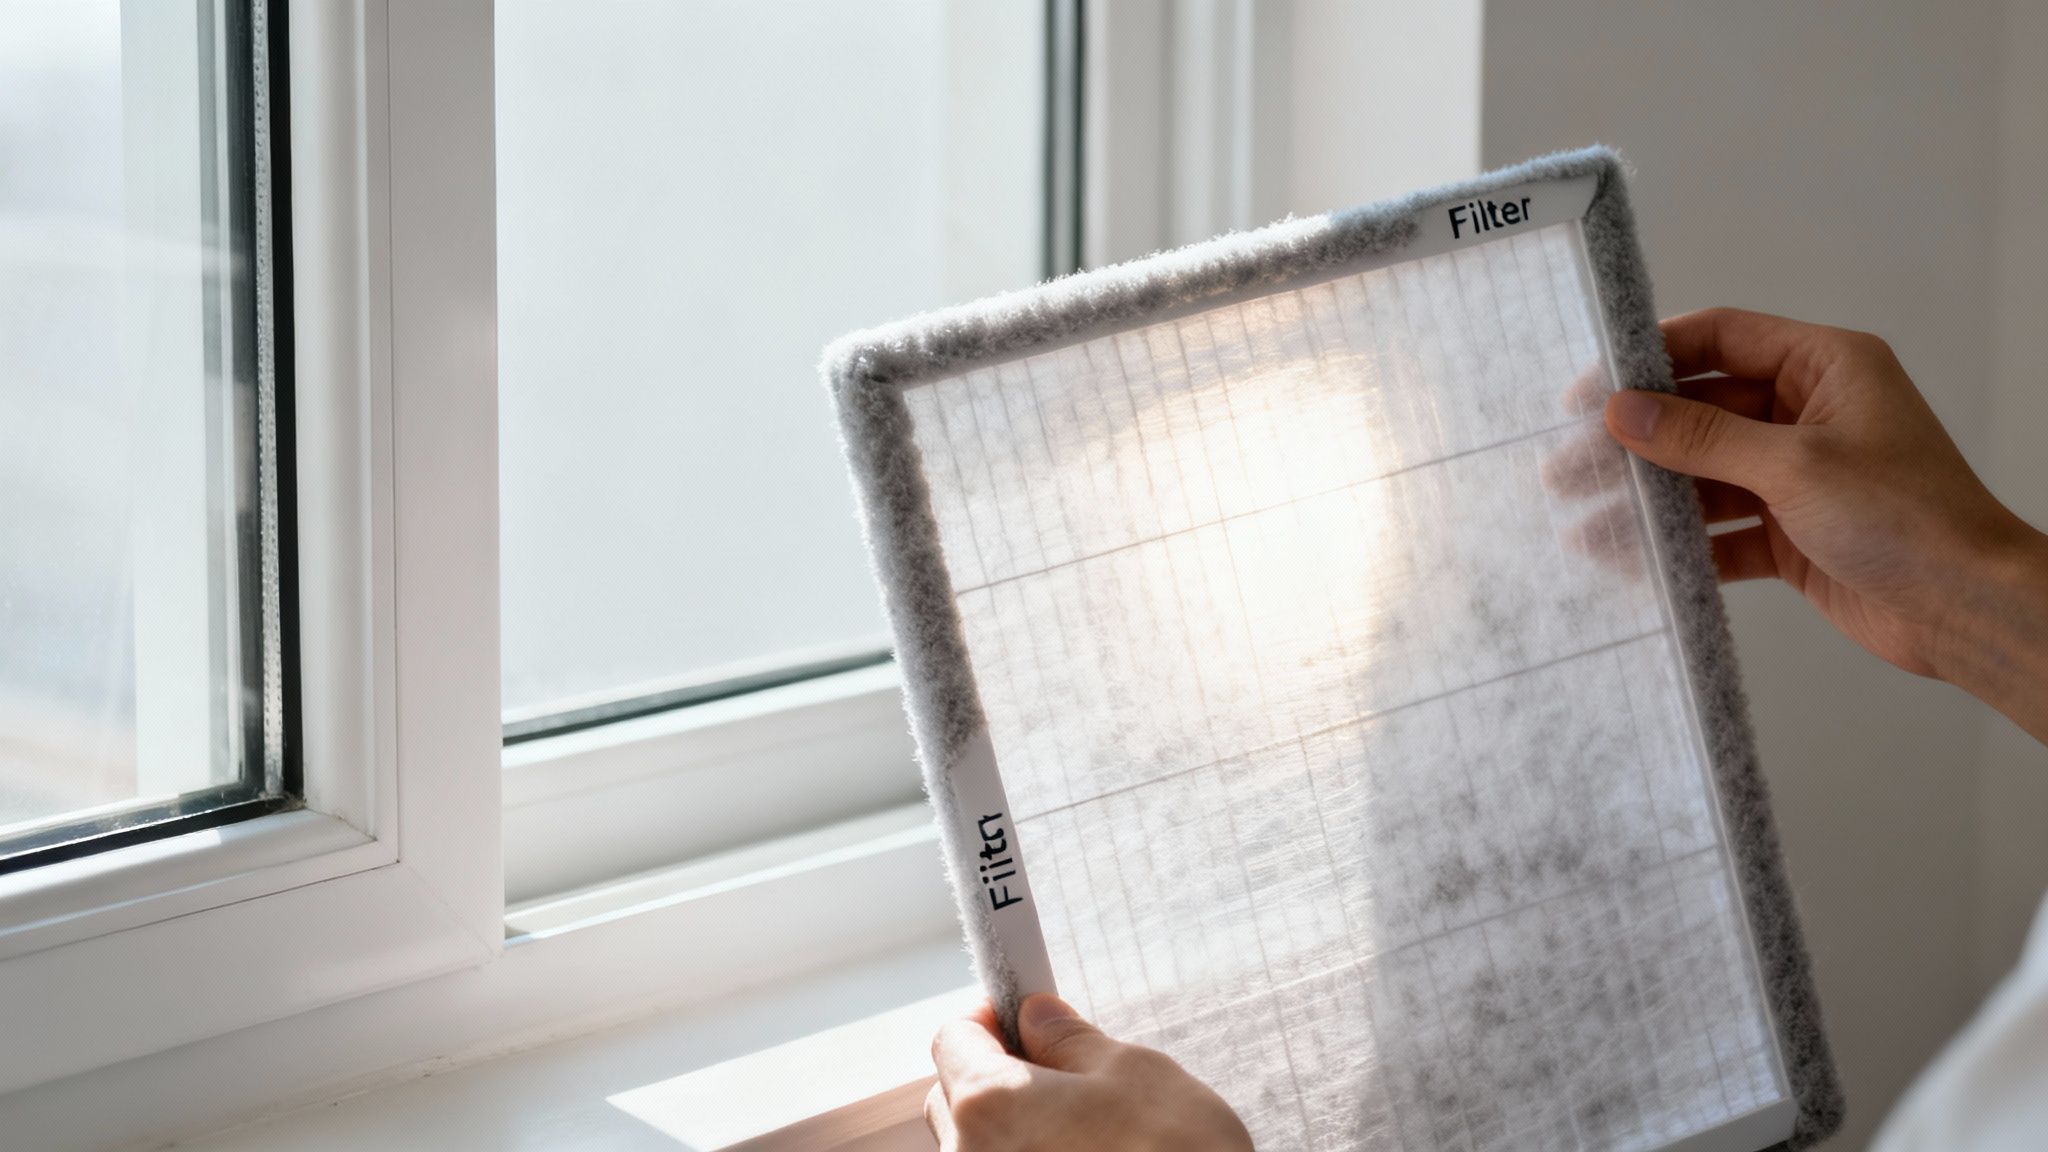
How A Dirty Air Filter Can Shut Down Your System
It sounds almost too simple to be a real problem, but a severely clogged air filter is one of the top reasons an AC unit will refuse to turn on. This goes way beyond just affecting your indoor air quality—it’s a mechanical issue that can bring your entire system to a grinding halt to protect itself from serious damage.
When that filter is completely choked with dust, pet hair, and other gunk, it essentially suffocates your system. The indoor unit, often called the air handler, can no longer pull in enough warm air from your house to blow over its ice-cold evaporator coils. This creates a critical imbalance.
Without that constant flow of warm air, the moisture that naturally condenses on the coils flash-freezes, quickly wrapping them in a thick layer of ice. This isn't just a minor inconvenience that stops the cooling; it trips a safety sensor designed to prevent a catastrophic compressor failure, shutting the whole system down.
Finding and Swapping a Clogged Filter
First thing's first: you have to find the filter. It's usually hiding in one of two spots—either right behind the large return air vent on your wall or ceiling or in a dedicated slot on the side of your indoor furnace or air handler.
Once you’ve located it, just slide the old filter out. The easiest way to tell if it's the culprit is the 'light test'. Hold it up to a lamp or a window. If you can't see much light passing through it, it's way past its prime and is definitely restricting airflow.
Putting the new one in is easy, but you have to get one detail right. Look for the arrows printed on the filter’s cardboard frame. These arrows must point in the direction the air is flowing, which is always toward the furnace or air handler unit, not out into your room.
A clogged filter is a top-tier culprit. Dirty air filters top the list of preventable reasons your AC won't turn on. Clogged filters restrict airflow by up to 50%, forcing the system to overheat and trigger safety shutoffs, accounting for 25-35% of non-starting complaints.
Filter Types and How Often to Change Them
Not all filters are made the same, and how often you need to replace yours really depends on your home and the type of filter you buy. For a deeper dive into keeping your system happy, you can find more information in our HVAC maintenance guides.
Here’s a quick rundown of the common types:
Fiberglass Filters: These are the basic, inexpensive blue ones. Plan on changing them every 30 days without fail.
Pleated Filters: A step up in filtration, these usually last up to 90 days. They're a good middle-ground for most homes.
High-Efficiency (HEPA) Filters: These have a high MERV rating (Minimum Efficiency Reporting Value) and can last anywhere from 6-12 months. Be careful, though, as their dense material can sometimes restrict airflow too much for older HVAC systems.
If you have pets that shed, live in a dusty area, or someone in the house has allergies, you’ll want to change your filter more often than the manufacturer recommends. A clean filter is the cheapest insurance you can buy against a sudden AC breakdown.
Advanced Issues That Require a Pro
So, you've checked the thermostat, flipped the breakers, and even put in a fresh air filter, but your AC unit is not turning on. This is the point where you’ve done everything you safely can. Now, we're likely looking at a problem deeper inside the system—one involving components that carry a serious electrical punch and need a technician’s touch.
This is the official end of the DIY road. Trying to diagnose your AC’s internal wiring without the right training and tools is incredibly dangerous. You could easily turn a straightforward fix into a full system replacement.
Let’s walk through the most common culprits so you’ll know what to expect and can have an informed conversation when you call a professional for help.
The Humming Sound of a Failed Capacitor
One of the most frequent calls we get for a "dead" AC unit comes down to a failed capacitor. You can think of it as a small battery that provides a powerful jolt to get the compressor and fan motors spinning. These parts wear out over time, especially when they're working overtime during a heatwave.
The classic sign of a bad capacitor is a distinct humming or buzzing noise coming from your outdoor unit. You can hear the system trying to kick on, but the fan blades just won't move. That hum is the sound of a motor that wants to run but isn't getting the electrical "kick" it needs to start.
Crucial Safety Warning: Never, ever try to touch or remove a capacitor yourself. Even when the power is completely shut off, a capacitor can hold a dangerous electrical charge strong enough to cause serious injury. This is a job strictly for a licensed HVAC technician.
The Contactor and Control Board
Another key electrical component is the contactor. It's basically a heavy-duty switch. When your thermostat calls for cooling, it sends a low-voltage signal to the contactor, which then closes and allows high-voltage power to flow to the compressor and fan motor. If that contactor is burned out or stuck, the signal from inside your house never makes it outside, and the unit stays silent.
Then you have the brains of the operation: the control board. This circuit board is the command center, managing everything from reading the thermostat's signals to running safety checks. A fried control board can cause all sorts of strange issues, like a complete lack of power (even with the breakers on) or a diagnostic light flashing an error code on the board itself.
Here’s a quick rundown of what these failures look like:
Bad Capacitor: You hear a humming or buzzing from the outdoor unit, but the fan won't spin.
Failed Contactor: The system is totally silent, even though the thermostat is clearly calling for cool air.
Faulty Control Board: The unit has no power despite the breakers being on, or it's behaving erratically.
Pinpointing these problems requires special tools like a multimeter and the ability to read complex wiring diagrams. If you suspect any of these parts are the problem, your next move is clear: find a qualified HVAC professional who can handle the repair safely and correctly.
Knowing When to Call an HVAC Professional
While rolling up your sleeves and tackling some basic AC troubleshooting can definitely save you time and money, the smartest homeowners know their limits. Pushing past your comfort zone, especially with high-voltage electrical components, is a recipe for disaster. A simple mistake can turn a straightforward repair into a full system replacement—or worse.
Knowing the clear warning signs that signal a job for a pro is the most important skill you can have. Once you've exhausted the simple fixes, it's time to step back and call for backup.
Electrical Red Flags You Can't Ignore
Your air conditioner is a high-voltage appliance, and certain behaviors are non-negotiable signs of a serious electrical fault. Don't even think about investigating these further on your own.
Here are the top electrical red flags that mean "stop and call a pro":
A Breaker That Won’t Stay Reset: You flip the breaker back on, and it immediately trips again. This isn't a fluke; it’s a clear sign of a short circuit or a dangerously overloaded connection. Continuously resetting it is a major fire hazard.
Visible Burnt Wires or Burning Smells: If you see any scorching or melting on wires, or catch a distinct burning plastic smell coming from your outdoor unit or indoor air handler, a component has failed. Shut the power off immediately.
Constant On-and-Off Cycling: Is the AC kicking on and off every few minutes? This could be an electrical part on its last legs or a severe airflow problem causing the system to overheat and trigger its safety shutoffs.
Mechanical Failure Symptoms
Beyond the wiring, there are distinct sounds and sights that tell you a core mechanical component has given up the ghost. These issues almost always require specialized tools and deep expertise to fix correctly.
The most classic symptom of a failed internal part is a distinct humming or buzzing sound from the outdoor unit, but the fan blades aren't spinning. This almost always points to a bad capacitor, a component that holds a dangerous electrical charge even when the power is off.
Other critical mechanical signs include:
Hissing Sounds or Oily Residue: A hissing noise is the sound of refrigerant escaping. If you see an oily film on the refrigerant lines, that confirms you have a leak. Handling refrigerant requires an EPA license and is not a DIY task.
Loud Grinding or Squealing: These awful noises often mean failing motor bearings or a serious compressor problem. Letting the system run with these issues can cause catastrophic, system-ending damage.
If you run into any of these red flags, your next move is simple: shut the system down at the breaker and find a qualified technician.
DIY Risks Vs Professional Repair Costs
It can be tempting to save a few hundred dollars by trying to fix a complex issue yourself, but the financial risk often outweighs the reward. A small mistake with a capacitor or contactor can cascade into a fried control board or a damaged compressor—turning a simple repair into a nightmare.
This table puts the potential costs into perspective.
Component FailurePotential Cost Of DIY MistakeAverage Professional Repair CostBest Course of ActionCapacitorFried control board or compressor ($1,500 - $3,000+)$150 - $450Call a ProContactorDamaged wiring, shorted compressor ($2,000+)$200 - $500Call a ProControl BoardShorting out the entire system ($4,000+)$400 - $900Call a ProRefrigerant LeakReleasing harmful chemicals, damaging compressor ($2,500+)$500 - $1,800Call a Pro
As you can see, attempting to fix these complex problems yourself just isn’t worth the risk to your safety or your HVAC system’s lifespan. To connect with vetted, top-rated local technicians in your area, you can easily request a free quote from a professional at AirCon Heat. It's the best way to ensure the job is done safely and correctly the first time.
Common Questions from Homeowners
Even after running through all the steps, it's natural to have a few questions lingering. HVAC systems are complex beasts with a lot of interconnected parts. Let's tackle some of the most common questions we get from homeowners who find themselves with an AC that just won't start.
Think of this as a quick-reference guide to clear up any final confusion and drive home the most important points.
Why Is My AC Unit Humming But Not Turning On?
Ah, the dreaded hum. If your outside unit is buzzing or humming away but the fan isn't spinning, you're almost certainly looking at a failed capacitor.
Think of the capacitor as a tiny, powerful battery that gives the fan motor and compressor the jolt they need to get started. When it fails, the motors still get power—hence the hum—but they don't have that initial kick to start turning. It's like trying to start a car with a dead battery.
This is one of those jobs that is absolutely not a DIY fix. Capacitors can hold a dangerous, high-voltage charge long after you've cut the power. Messing with one without the right training and tools is a recipe for a nasty shock.
How Long Should I Wait After Resetting The Breaker?
That's a fantastic and important question. Once you've flipped a tripped breaker back on, give it about 30 minutes before you try to start the AC from the thermostat.
Why the wait? Your air conditioner has internal protective circuits that need time to reset properly after a power interruption. Firing it up too quickly can sometimes confuse the system, causing it to go into a "lockout" mode or even damaging sensitive electronics with a sudden power surge.
Crucial Reminder: If that breaker trips again right after you turn the system back on, stop. Do not reset it a second time. This is a clear signal of a serious electrical problem that needs a professional to diagnose safely. It could be a short circuit, which is a significant fire risk.
Can I Just Top Off My AC Refrigerant Myself?
The short answer here is a hard no. You should never, ever try to add refrigerant (you might know it by brand names like Freon) to your AC system on your own.
This isn't just about being handy; it's a matter of safety, legality, and protecting your equipment.
Here’s why this is a job strictly for the pros:
It Requires a License: Refrigerants are regulated by the EPA. Technicians go through specific training and certification to handle these chemicals safely and legally.
Low Refrigerant Means There's a Leak: Your AC is a sealed system. If you're low on refrigerant, it's not because it got "used up"—it's because you have a leak somewhere. A pro won't just add more; they'll find and fix the leak first. Topping it off is like putting air in a tire with a nail in it—it’s not a fix.
The Wrong Amount Causes Serious Damage: Too much or too little refrigerant will wreck your compressor, which is by far the most expensive part of your entire AC unit. Getting the charge level perfect requires specialized gauges and knowledge.
Trying to do this yourself is a major risk to your safety and the health of your very expensive HVAC system.
If you've gone through this guide and your AC is still out of commission, it’s time to bring in an expert. AirCon Heat connects you with top-rated, licensed, and insured local HVAC contractors who can get the job done right. Request a free, no-obligation quote today and get your cool air back safely and quickly.