When your home starts to feel like a sauna on a hot day, the last thing you want to discover is your AC unit pushing out lukewarm air. The immediate question, “Why is my AC not blowing cold air?”, can trigger a wave of anxiety about both your immediate comfort and the potential for expensive repair costs. Fortunately, the problem isn't always a catastrophic system failure. Many common issues can be diagnosed and even fixed without an immediate, costly service call.
The root cause often lies in something surprisingly simple. It could be a clogged air filter restricting airflow, incorrect thermostat settings, or an outdoor unit that's blocked by leaves and debris. Understanding these potential culprits is the first and most critical step toward restoring your cool, comfortable living space. Other times, the issue might be more complex, such as low refrigerant levels indicating a leak, a frozen evaporator coil, or a faulty electrical component like a capacitor.
This comprehensive diagnostic guide is designed to walk you through 7 key troubleshooting steps. We've organized this checklist to start with the easiest and most common DIY fixes before moving on to more complex problems that might require professional assistance. By following this structured process, you will be empowered to identify the root cause of the problem, perform safe and effective fixes where possible, and, most importantly, know exactly when it’s time to call a qualified HVAC expert to get your system back to peak condition. Let's start diagnosing why your AC is not blowing cold air.
1. Check and Replace Your Air Filter
If you’ve discovered my ac not blowing cold air, the very first and most crucial step is to check your system's air filter. This simple component is designed to trap dust, pet dander, pollen, and other airborne particles, but when it becomes clogged, it can cause significant cooling problems. A dirty filter severely restricts the flow of warm air from your home into the HVAC unit.
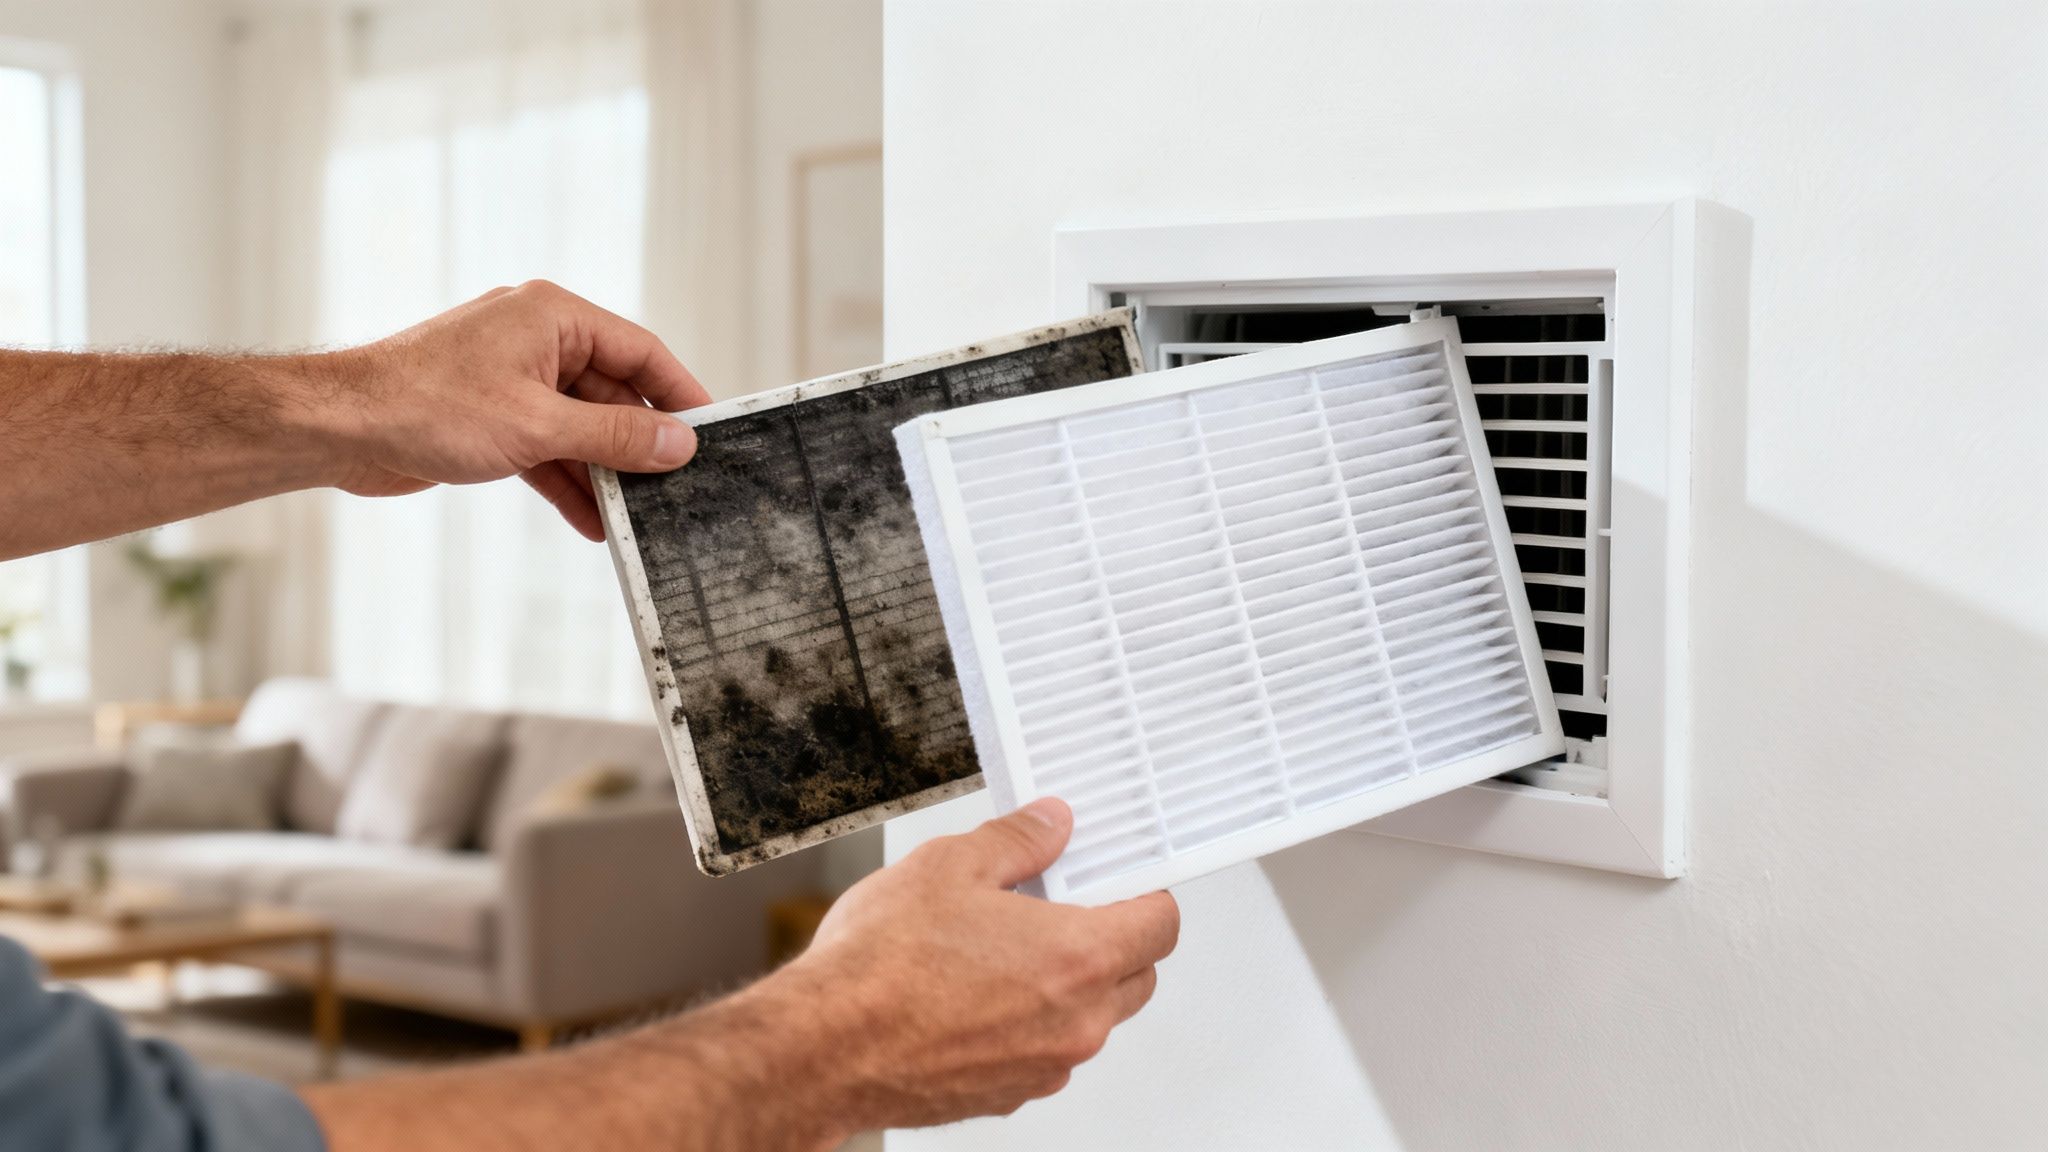
This restricted airflow prevents the evaporator coil from absorbing heat effectively. Without enough warm air passing over it, the coil can get too cold and even freeze over, completely blocking airflow and stopping the cooling process. The result is an AC system that runs continuously but only pushes out weak, room-temperature air.
Why It’s the First Step
Before you even think about calling an HVAC professional, inspecting the air filter is a mandatory first action. It is the single most common reason for an air conditioner to stop cooling efficiently. Fortunately, it's also the easiest and cheapest problem to fix yourself, requiring no special tools or technical expertise.
A prime example is a homeowner who noticed their AC was struggling during a summer heatwave. After finding the unit blowing lukewarm air, they checked their filter and discovered it was completely gray with dust and debris. Within minutes of replacing it with a clean one, cool air began flowing strongly again, resolving the issue without a costly service call.
How to Check and Replace Your Filter
Follow these simple steps to ensure your air filter isn't the culprit behind your cooling woes:
- Locate the Filter: The air filter is typically located in your indoor air handler unit (often in a closet, attic, or basement) or in a return air vent in a wall or ceiling.
- Turn Off the Power: For safety, turn off your thermostat and the circuit breaker connected to your HVAC system before opening any panels.
- Inspect and Replace: Slide the old filter out. If it’s visibly dirty, clogged with debris, or you can’t see light through it, it needs to be replaced immediately. Slide the new filter in, making sure the arrows on the frame point in the direction of the airflow (towards the air handler).
- Restore Power: Turn the breaker and thermostat back on.
Pro Tip: Keep a few spare filters on hand. Mark the date of replacement directly on the filter frame or set a recurring reminder on your phone. This simple habit can save you from future headaches and ensure your system runs at peak efficiency. For more maintenance insights, you can explore the various topics discussed on the AirCon Heat blog.
2. Verify Thermostat Settings and Battery Backup
After confirming your air filter is clean, the next logical step when you find my ac not blowing cold air is to examine your thermostat. This small device acts as the brain of your entire HVAC system, telling the air conditioner when to turn on, how long to run, and when to shut off. An incorrect setting or a simple malfunction here can easily prevent your system from cooling properly.
Even a seemingly minor issue, like the system being set to "Fan Only" or having dead batteries, will stop the cooling process before it can even begin. The fan may still blow air through your vents, but without the command to activate the outdoor condenser unit, that air will remain at room temperature. This creates the illusion that the AC is working when, in reality, it's just circulating stagnant, warm air.
Why It’s the Second Step
The thermostat is the second most common and easily fixable cause of cooling problems. Before assuming a major mechanical failure, it's essential to rule out this simple command-and-control issue. Many homeowners have spent hundreds on unnecessary service calls only to have a technician point out a setting was wrong or the batteries needed replacing, a fix that takes just a few moments.
Consider a family who returned from vacation to a sweltering home. Their AC was running, but the air was warm. Panicked, they scheduled an emergency repair, but before the technician arrived, they decided to double-check the thermostat. They discovered their smart thermostat's schedule had been accidentally overridden to a "hold" temperature of 78°F. After correcting the setting, cool air started flowing immediately, allowing them to cancel the expensive service call.
How to Check Your Thermostat Settings
Follow these simple steps to ensure your thermostat isn’t the reason your AC is failing to cool:
- Check the Mode: Ensure the thermostat is set to "Cool" mode, not "Heat," "Fan," or "Off." The fan setting will circulate air without activating the cooling components.
- Lower the Temperature: Set the desired temperature at least 3-5 degrees below the current room temperature. This sends a clear signal to the AC unit to start a cooling cycle.
- Inspect the Batteries: If you have a digital, non-hardwired thermostat, a low battery warning may appear, or the screen might be blank. Replace the batteries, which are typically AA or AAA, located behind the faceplate.
- Review Schedules and Holds: For programmable or smart thermostats like those from Nest or Ecobee, check for any "hold" settings or active schedules that might be preventing the system from cooling at the desired time.
Pro Tip: When changing batteries, do it quickly to avoid losing your programmed settings. It's a good practice to replace thermostat batteries twice a year, perhaps when you change your clocks for daylight saving time. This preventative step ensures your system is always ready to respond when you need it.
3. Inspect and Clear the Outdoor Condenser Unit
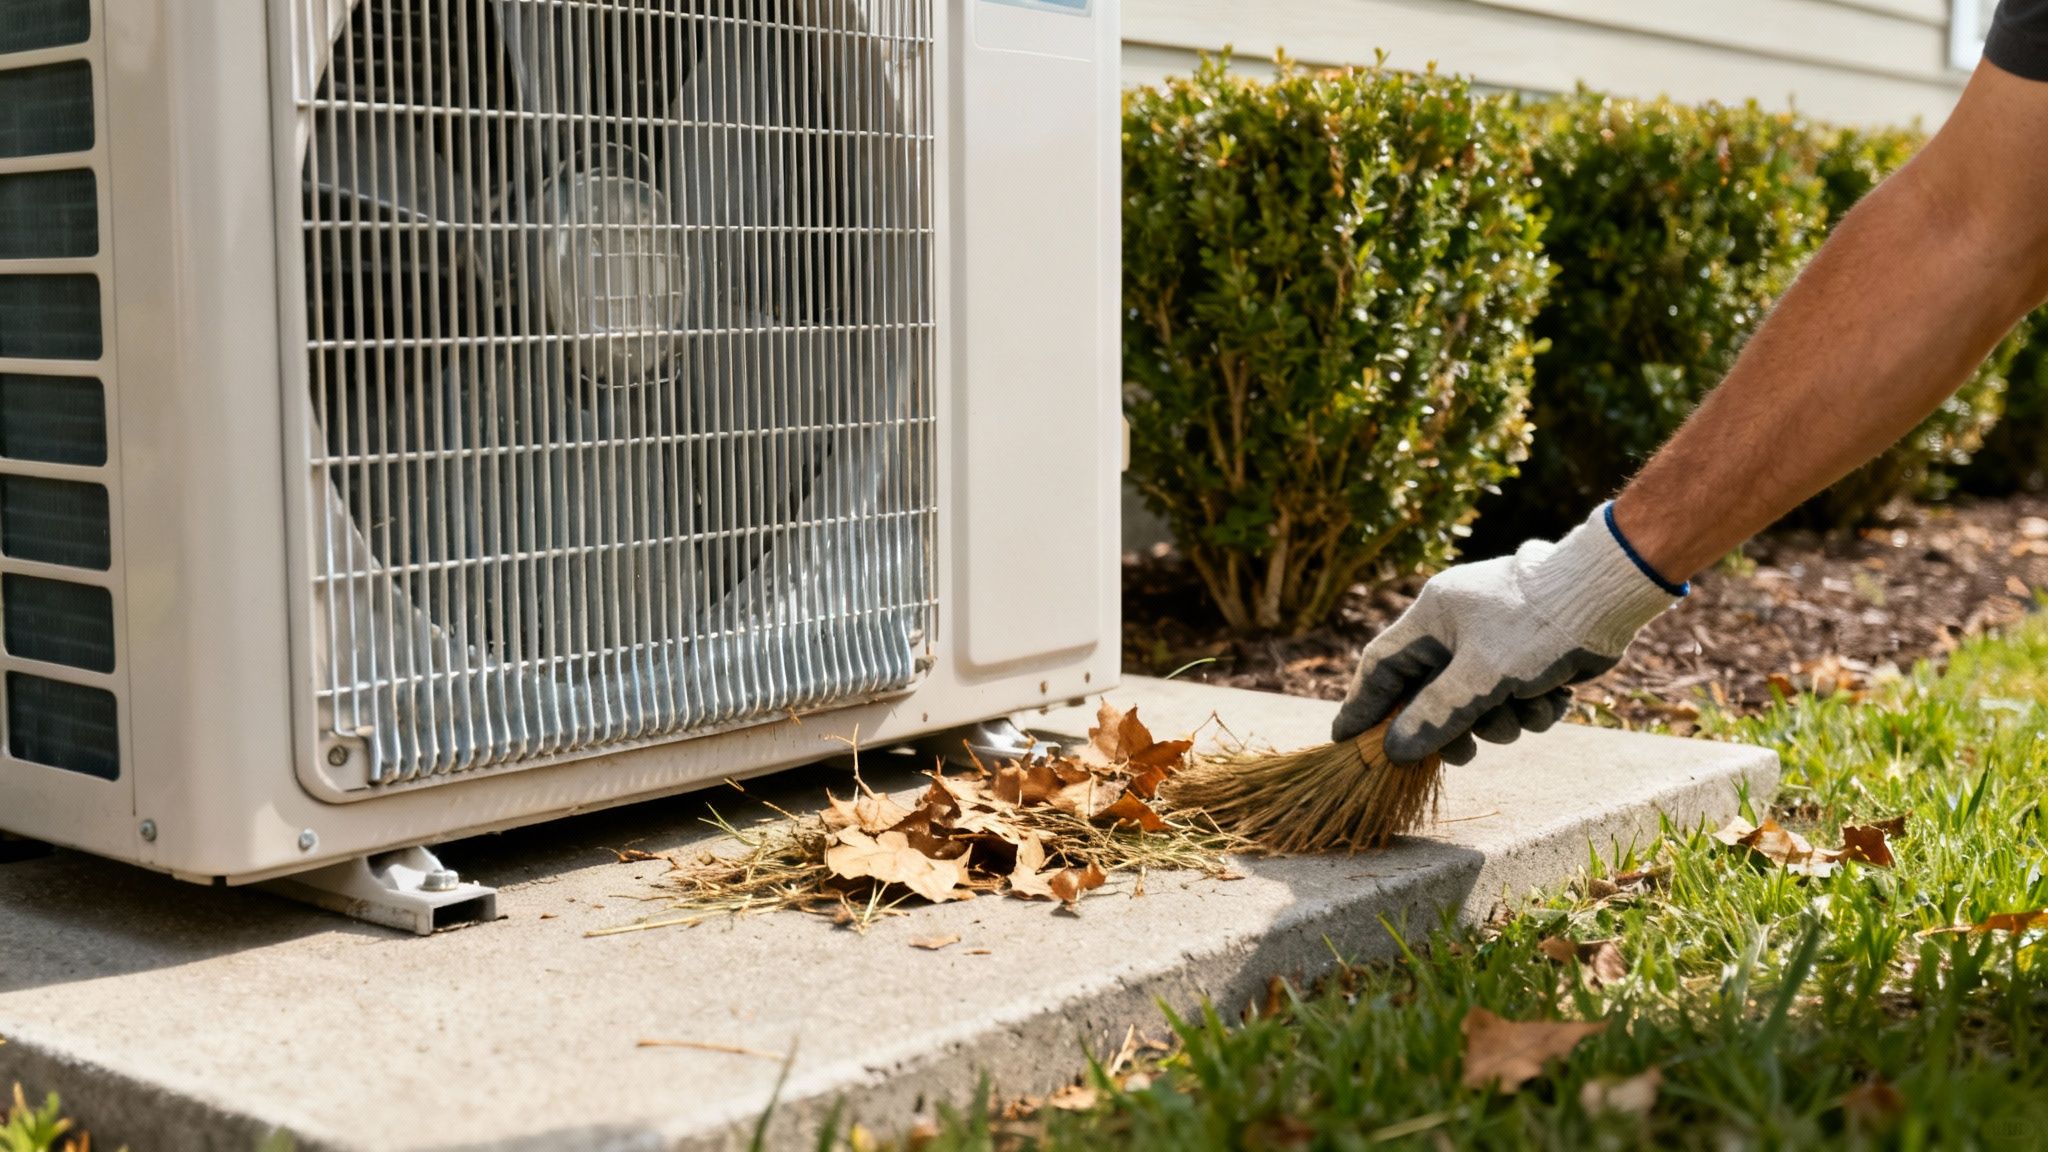
If you've confirmed your filter is clean and still find my ac not blowing cold air, the next logical step is to examine your outdoor unit. The condenser unit is the large, boxy machine outside your home responsible for releasing the heat absorbed from inside. When it gets covered in dirt, leaves, grass clippings, and other debris, it can’t dissipate heat effectively, severely hindering the cooling process.
This trapped heat forces your entire system to work much harder to cool your home. The compressor can overheat, and the refrigerant can't properly cool down before being sent back inside. This strain not only results in warm air blowing from your vents but also increases energy consumption and can lead to premature system failure if left unaddressed.
Why It’s a Critical Check
A dirty condenser is one of the most common, yet often overlooked, causes of poor cooling performance. Many homeowners focus on the indoor components and forget that the outdoor unit is just as vital. Clearing away debris is a straightforward DIY task that can restore your AC's cooling power without needing a professional service call.
For instance, a homeowner might notice their AC running constantly but the house remaining warm. A quick look outside reveals the condenser unit is blanketed in cottonwood seeds and overgrown with bushes. After shutting off the power and clearing the debris, they find the system immediately begins to blow cold air again, demonstrating the direct impact of proper outdoor unit maintenance.
How to Inspect and Clean Your Condenser
Follow these steps to safely clean your outdoor unit and improve its efficiency:
- Shut Off All Power: Your safety is paramount. Turn off the AC at the thermostat, then locate the outdoor electrical disconnect box near the unit and switch it to the “off” position. You should also turn off the corresponding breaker in your home's main electrical panel.
- Clear Debris and Trim Vegetation: Remove any leaves, twigs, grass, or dirt from around and on top of the unit. Trim back any shrubs, weeds, or branches to ensure there is at least two to three feet of clear space on all sides for proper airflow.
- Gently Clean the Fins: Use a soft-bristled brush or a shop vacuum with a brush attachment to gently remove dirt from the metal fins. Be careful not to bend them, as this can restrict airflow.
- Rinse with a Hose: Using a garden hose with a gentle spray nozzle, rinse the fins from the inside out to push debris away from the unit. Never use a high-pressure washer, as it can easily damage the delicate fins.
Pro Tip: Make condenser cleaning a part of your regular seasonal maintenance. Inspecting and cleaning it in the spring before the cooling season and again in the fall can prevent performance issues. For a deeper clean, consider scheduling an annual professional tune-up with a certified technician from the AirCon Heat network.
4. Check Refrigerant Levels and Detect Leaks
If you’ve ruled out simpler issues and are still wondering my ac not blowing cold air, the problem could be low refrigerant. Refrigerant, often known by brand names like Freon, is the vital chemical substance that circulates through your AC system to absorb heat from inside your home and release it outside. It's a closed-loop system, meaning refrigerant should never be "used up" or run low unless there is a leak.
When a leak occurs in the refrigerant lines, coils, or compressor, the system loses its ability to cool effectively. As the refrigerant level drops, the pressure inside the system decreases, preventing it from properly absorbing heat. This not only results in warm air blowing from your vents but can also lead to more severe problems like a frozen evaporator coil or a damaged compressor, which is one of the most expensive components to replace.
Why It’s a Professional Job
Unlike changing an air filter, checking refrigerant levels and repairing leaks is not a DIY task. Refrigerant is a regulated chemical that requires special handling and equipment according to EPA regulations. Certified HVAC technicians have the training and tools, like electronic leak detectors and pressure gauges, to safely and accurately diagnose the problem. Attempting to handle refrigerant without certification is illegal and dangerous.
A common scenario involves a homeowner who notices their AC is less effective each year. They might hear a faint hissing sound or see ice on the outdoor unit's copper lines. A qualified technician can perform a leak detection test, pinpoint the source of the leak (often a tiny crack in a solder joint or a corroded coil), repair it, and then recharge the system to the manufacturer's precise specifications, restoring its cooling power.
How to Spot Signs of a Refrigerant Leak
While you can't fix a leak yourself, you can identify the warning signs that indicate it's time to call a professional:
- Hissing or Bubbling Noises: Unusual sounds coming from the indoor or outdoor unit can signal escaping refrigerant gas.
- Visible Ice Buildup: Frost or ice on the refrigerant lines or evaporator coil is a classic sign of low refrigerant.
- Oily Residue: The refrigerant is mixed with oil to lubricate the compressor. An oily substance around fittings or on the copper lines points to a leak.
- Longer Cooling Cycles: If your AC runs constantly but struggles to reach the set temperature, it may be low on refrigerant.
- Higher Energy Bills: A leaking system works much harder, leading to a sudden and unexplained spike in your electricity costs.
Pro Tip: If your system uses R-22 refrigerant (common in units made before 2010), a leak presents a bigger problem. R-22 is being phased out and is extremely expensive. In this case, it's often more cost-effective to replace the entire system rather than pay for a costly recharge. For expert advice on system repair versus replacement, homeowners can consult with local professionals like those found through AirCon Heat's Abilene, TX services to get a clear assessment.
5. Examine the Evaporator Coil for Ice Buildup or Frozen Conditions
If your filters are clean and you're still thinking, "my ac not blowing cold air," the next likely culprit is a frozen evaporator coil. This crucial component, located inside your indoor air handler, is responsible for absorbing heat from your home's air. When it freezes over, it can no longer perform this function, leading to a complete stop in the cooling process.
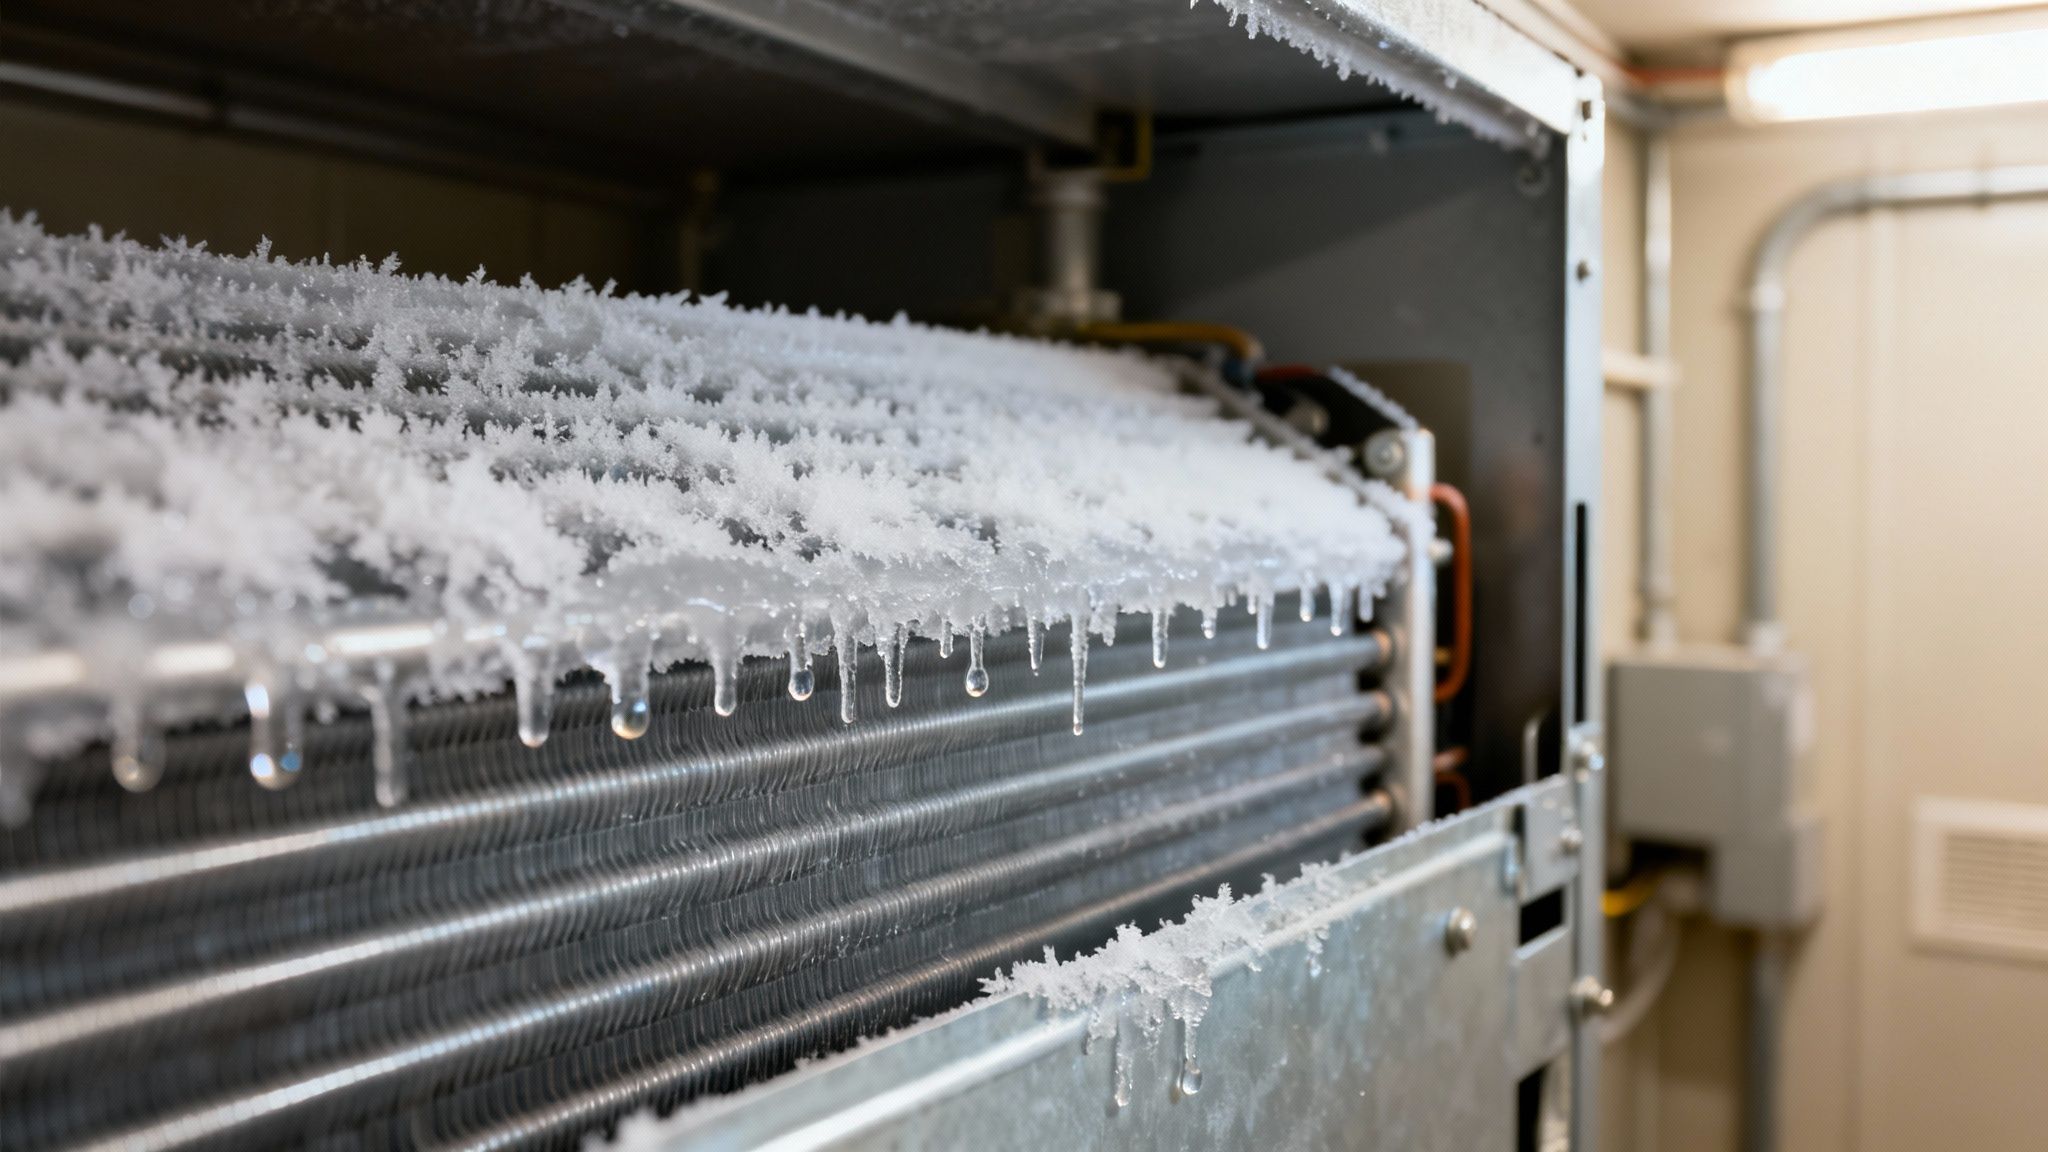
A frozen coil is typically a symptom of an underlying problem, most commonly restricted airflow from a dirty filter or blocked vents. Without sufficient warm air moving across it, the coil’s temperature plummets below freezing, causing the condensation on its surface to turn into ice. This ice buildup acts as an insulator, preventing any heat exchange and potentially causing serious damage to your compressor if the system continues to run.
Why This Is a Critical Check
Identifying a frozen evaporator coil is a major diagnostic step. While a clogged filter is a simple fix, a frozen coil points to a more significant issue that requires immediate attention to prevent costly repairs. Allowing the system to operate with a block of ice inside can strain the compressor to the point of failure, which is one of the most expensive components to replace.
For instance, a homeowner might notice weak airflow and that the AC unit is running nonstop without cooling the house. Upon opening the indoor air handler panel, they find the entire coil encased in ice. This discovery immediately signals that the problem is more than just a thermostat setting; it’s a system malfunction that needs to be addressed correctly to avoid breaking the unit.
How to Safely Thaw the Coil and Diagnose the Issue
If you suspect a frozen coil, you must act carefully to prevent damage. Follow these steps:
- Turn Off the AC System: Go to your thermostat and switch the system from "Cool" to "Off." This stops the cooling cycle and prevents further ice formation.
- Activate the Fan: Switch the thermostat's fan setting from "Auto" to "On." This will circulate room-temperature air across the frozen coil, helping to melt the ice safely and gradually.
- Do Not Manually Remove Ice: Never use a sharp object or a heat gun to chip away or melt the ice. The coil's fins are extremely delicate and can be easily punctured, leading to an expensive refrigerant leak.
- Check for Obvious Causes: While the coil is thawing (which can take several hours), re-check your air filter and ensure all supply and return vents are open and unobstructed.
- Monitor and Call a Professional: Once the ice has melted completely, you can try turning the AC back on. If it freezes up again, it's a clear sign of a deeper issue, such as a refrigerant leak or a faulty blower motor, that requires a certified technician to diagnose and repair.
Pro Tip: Look for secondary signs of a frozen coil, such as water stains or puddles around your indoor air handler, which can be caused by the melting ice overwhelming the drain pan. If the issue recurs, it’s crucial to call for professional service to pinpoint the root cause. For expert help, you can connect with a qualified technician through the AirCon Heat network.
6. Test the Capacitor and Contactor Components
When your troubleshooting efforts for my ac not blowing cold air move beyond simple maintenance, it’s time to consider key electrical components. The capacitor and contactor are two critical parts inside your outdoor condenser unit that control the flow of power to the compressor and fan motor. If either of these fails, your system loses its ability to cool your home.
The capacitor acts like a battery, providing a high-voltage jolt to start the compressor and motors, while the contactor is a switch that closes to complete the electrical circuit when the thermostat calls for cooling. Over time, exposure to heat and power surges causes these parts to degrade and eventually fail, leading to a system that hums or buzzes but never starts the cooling cycle.
Why It’s a Critical Diagnostic Step
While a dirty filter is the most common issue, a failed capacitor or contactor is the most frequent cause of mechanical or electrical failure. These components are wear-and-tear items with a typical lifespan of 10-15 years. Ignoring them can lead to more severe damage, as a struggling motor can overheat and burn out, turning a simple repair into a major expense.
Consider a homeowner who hears a strange humming and clicking from their outdoor unit. The fan isn't spinning, and the air inside is warm. An HVAC technician arrives and quickly diagnoses the problem using a multimeter. The capacitor has failed and can no longer provide the necessary power to start the compressor. A quick replacement of the part restores power, and the AC begins blowing cold air again, preventing a more catastrophic failure.
How to Address Capacitor and Contactor Issues
Due to the extreme electrical hazard, testing and replacing these components is a job exclusively for a qualified HVAC professional. Never attempt to handle a capacitor yourself, as it can hold a dangerous electrical charge even when the power is off.
- Recognize the Signs: Listen for a buzzing or clicking sound from the outdoor unit without the fan or compressor engaging. This is a classic symptom of a failed capacitor or contactor.
- Call a Professional: Contact a certified HVAC technician immediately. Explain the symptoms you've observed, which will help them come prepared for the repair.
- Confirm the Diagnosis: The technician will use a multimeter to safely test the microfarad (µF) reading of the capacitor and check the contactor for electrical continuity and signs of pitting or burning.
- Discuss Replacement Options: If a part has failed, ask the technician about the warranty on the new components. It's often recommended to replace both the capacitor and contactor simultaneously for enhanced reliability, especially if they are the same age.
Pro Tip: When a technician replaces these parts, always ask for the old components and keep the invoice. This documentation is valuable for your home’s maintenance records and can be useful if the new parts fail prematurely under warranty. For more expert advice, check out the resources on the AirCon Heat blog.
7. Schedule Professional System Diagnostics and Maintenance
If you’ve tried all the DIY troubleshooting steps and are still dealing with my ac not blowing cold air, it’s time to call in the experts. Professional HVAC diagnostics and maintenance are the definitive solution when the problem lies beyond simple fixes. Certified technicians have the specialized tools and training to accurately identify and repair complex mechanical and electrical issues that homeowners cannot safely address.
A technician can perform a comprehensive system analysis, including pressure testing for refrigerant leaks, electrical diagnostics on capacitors and contactors, airflow measurements, and a full inspection of the compressor and motors. This thorough process pinpoints the exact cause, whether it's a failing component or a refrigerant imbalance, ensuring the correct repair is made the first time.
Why It’s a Crucial Step
When basic troubleshooting fails, continuing to run the AC can cause further, more expensive damage. A simple capacitor failure, for instance, can lead to a burnt-out compressor if left unaddressed. Calling a professional is not just about fixing the immediate problem; it's about protecting your long-term investment in your HVAC system.
Consider a homeowner whose AC was blowing warm air despite a clean filter and clear condenser. A technician discovered a minor refrigerant leak that was slowly damaging the compressor. By catching it early, they were able to repair the leak and recharge the system, saving the homeowner from a premature and costly full unit replacement. Regular professional maintenance, often recommended by manufacturers and efficiency programs like EPA Energy Star, can prevent these scenarios and extend system life by years.
How to Schedule Professional Service
Follow these tips to ensure you get reliable, high-quality service for your cooling system:
- Find Reputable Technicians: Use a trusted platform to find top-rated local contractors. It’s wise to seek out professionals with a high star rating (4.5 or more) to ensure you receive quality work.
- Get Multiple Quotes: Contact at least three licensed and insured companies to compare their diagnoses and written estimates before authorizing any repairs.
- Ask Questions: Request that the technician explain their findings in clear, non-technical terms. Understand exactly what is wrong and what the proposed solution entails.
- Inquire About Guarantees: Ask about service warranties on both parts and labor to ensure you are covered if the problem reoccurs.
- Keep Records: Save all maintenance receipts and repair invoices. This documentation is valuable for warranty claims and can increase your home's resale value.
Pro Tip: Schedule preventative maintenance in the spring before the cooling season begins. This allows a technician to clean and tune your system, catching potential issues before they leave you sweating during a heatwave. To find certified local professionals, you can explore the trusted contractor network at AirCon Heat.
7-Point Comparison of AC Cooling Fixes
Task Core Features ✨ Ease/Skill ★ Cost 💰 Best For 👥 Pro Needed? 🏆 Check and Replace Your Air Filter Traps dust/pollen; MERV 1–20; improves airflow ✨ ★★★★★ Very Easy 💰 $15–50/filter 👥 DIY homeowners, pet owners, allergy sufferers 🏆 Not required; call pro for recurring issues Verify Thermostat Settings and Battery Backup Controls compressor; smart/WiFi; battery backup ✨ ★★★★☆ Very Easy 💰 $0–20 (batteries) 👥 Smart-home users, budget-conscious owners 🏆 Usually DIY; pro for calibration/connectivity Inspect and Clear the Outdoor Condenser Unit Coils/fins reject heat; needs 2–3 ft clearance ✨ ★★★☆☆ Easy–Moderate 💰 $0–100 DIY; $150–300 pro 👥 Homes with yard/vegetation nearby 🏆 Pro if heavy debris or fin/coil damage Check Refrigerant Levels and Detect Leaks Sealed refrigerant loop; R‑410A/R‑22; leak detection ✨ ★☆☆☆☆ Not DIY 💰 $200–1,500+ (repair/recharge) 👥 Older systems, low-cooling homes 🏆 EPA-certified tech required — use 4.5+ pros Examine the Evaporator Coil for Ice Buildup Indoor coil frost; airflow/refrigerant signs ✨ ★★☆☆☆ Detect DIY, diagnose by pro 💰 $0 (thaw) or $150–400 pro 👥 Homes with weak airflow or iced coils 🏆 Call pro if freezing recurs or root cause unknown Test the Capacitor and Contactor Components High-voltage start components; clicking/bulging signs ✨ ★☆☆☆☆ Not DIY (electrical hazard) 💰 $150–400 (parts & labor) 👥 Units that won't start or age 10–15 yrs 🏆 Professional replacement highly recommended Schedule Professional System Diagnostics & Maintenance Multi-point inspection; pressure/electrical/airflow tests ✨ ★☆☆☆☆ Professional Service 💰 $75–150 diag + $200–2,000+ repairs 👥 All homeowners; preventive & resale prep 🏆 Recommended biannually; find vetted pros on AirCon HeatWhen to Stop DIY and Connect With a Pro
Navigating the frustration when you realize, "my ac not blowing cold air," can be a daunting experience. Throughout this guide, we've walked through a comprehensive checklist designed to empower you with the knowledge to tackle the most common culprits. From the simple yet critical task of replacing a clogged air filter to ensuring your thermostat is correctly configured, these initial steps are your first line of defense. By methodically inspecting your outdoor condenser unit for obstructions and checking your evaporator coil for signs of ice, you've already ruled out a significant number of potential issues that plague homeowners.
These DIY diagnostics are invaluable. They not only save you from an unnecessary service call but also build your confidence and understanding of how your HVAC system operates. Successfully identifying and resolving a minor problem like a dirty filter or a tripped breaker restores your home’s comfort and saves you money. The goal is to equip you to handle the basics safely and effectively.
Recognizing the Boundaries of DIY HVAC Repair
However, the journey from troubleshooting to repair has a clear and critical stopping point for any homeowner without professional certification. The moment your investigation points toward complex electrical components or the sealed refrigerant system, the DIY path ends. Issues such as a failed capacitor, a faulty contactor, or a suspected refrigerant leak are not just complicated; they are genuinely hazardous to tackle without the right training and specialized equipment.
- Electrical Dangers: Components like capacitors store a high-voltage electrical charge even when the power is off. A single mishandling can result in severe electrical shock or even fatality. Technicians use specific tools and follow strict safety protocols to discharge these components before handling them.
- Refrigerant Handling: Refrigerant is a regulated chemical that requires an EPA 608 certification to handle legally and safely. Attempting to "top off" or repair a leak on your own is illegal, harmful to the environment, and can cause irreversible damage to your compressor, the most expensive part of your AC system.
- Diagnostic Complexity: When the basic checks don't solve the problem, the issue likely lies deeper within the system. A professional technician uses diagnostic tools like multimeters, refrigerant gauges, and leak detectors to pinpoint the exact cause. Guesswork can lead to replacing the wrong parts, wasting money, and leaving the root problem unresolved.
Your Actionable Next Steps for Lasting Comfort
If you have diligently followed the DIY steps in this guide and your AC is still not blowing cold air, you’ve done your part. You have successfully narrowed down the possibilities, making the professional's job more efficient when they arrive. Your next step is not one of defeat, but of smart, safe delegation. It's time to transition from hands-on repair to finding a qualified expert who can take over. This is the most crucial decision you can make to protect your safety, your home, and your investment in your HVAC system. A certified professional can accurately diagnose the problem, provide a clear explanation of the necessary repairs, and execute the work according to industry standards and local codes. This ensures the repair is done right the first time, restoring your comfort and giving you peace of mind.
Don't let the search for a trustworthy technician add more stress to your situation. When you're facing a stubborn AC issue, AirCon Heat connects you with top-rated, licensed, and insured local HVAC professionals ready to solve your problem quickly and correctly. Get fast, free quotes and schedule your service with a proven expert by visiting AirCon Heat today.